An interesting chocolate cake that reveals vertical layers when cut.
Find the gluten and dairy free version here: GF DF Melody Cake
Dark Chocolate Spread:
Milk – 120g
Sugar – 50g
Coco Powder – 1tbsp
Vanilla Extract – 1tsp
Dark Chocolate – 60g
Butter – 70g
Instructions:
Combine milk and sugar in a pan, bring to boil, and take off heat. Add in coco powder, vanilla, dark chocolate. Mix until smooth. Cool to room temperature and whip in the butter. Cover surface with clingfilm until you are ready to use.
Plain Rolling Sponge: make 3
Eggs (separated) – 2
Sugar – 20g + 10g
Vegetable Oil – 25g
Milk -30g
Flour – 40g
Instructions:
Pre heat oven to 160 C Fan. Line a rectangular baking tin 30x20cm.
Whip the egg whites to foam, add 20g sugar and whisk to stiff peaks.
In a separate bowl, whisk 10g of sugar and the egg yolks until pale. Pour in vegetable oil while whisking. Add the milk while whisking. Sift in the flour and mix – this mixture will be runny. Fold in the egg whites into the runny yolk mixture.
Bake for about 15 minutes.
Once baked, cover both sides of sponge in baking paper, and use a tea towel to form into a roll (rolled from the shorter side). Cool in the shape of the roll.
Chocolate Sponge:
Eggs (separated) – 4
Sugar – 100g
Butter – 90g
Vanilla extract – 1tsp
Dark Chocolate (melted and tempered) – 90g
Flour – 80g
Instructions:
Pre heat oven to 160 C Fan.
Whip the egg whites to foam, add sugar and whisk to stiff peaks.
Whip the butter in a mixer and add in the egg yolks and vanilla extract. Pour in the dark chocolate and mix. Fold in the egg whites and flour.
Bake for 35-40 minutes.
Cool in the tin. The cake will have a hard crust over the top, collect this off the top for later decoration. Once cooled slice the sponge into 2 layers.
Cake Assembly Instructions for the rolling sponge:
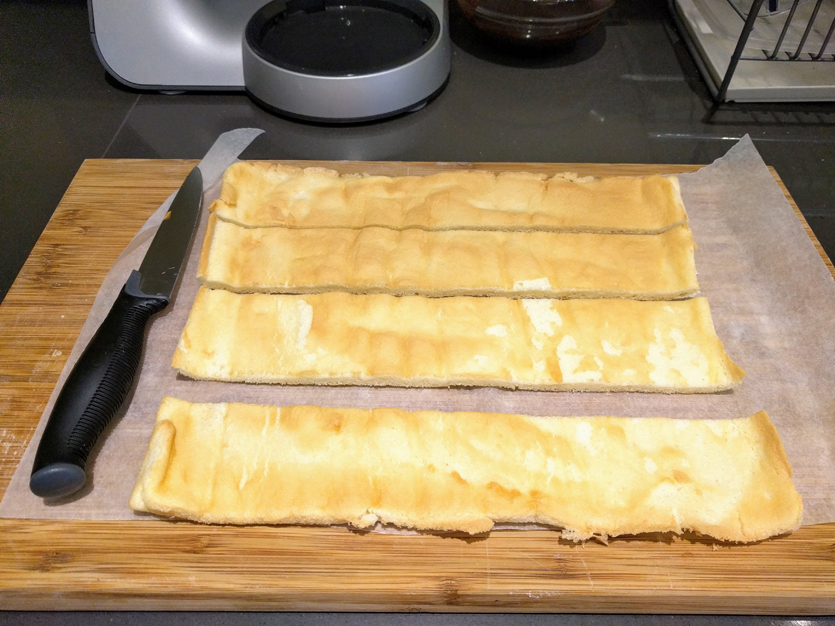
Unroll the plain sponge, and cut lengthwise 5cm strips.
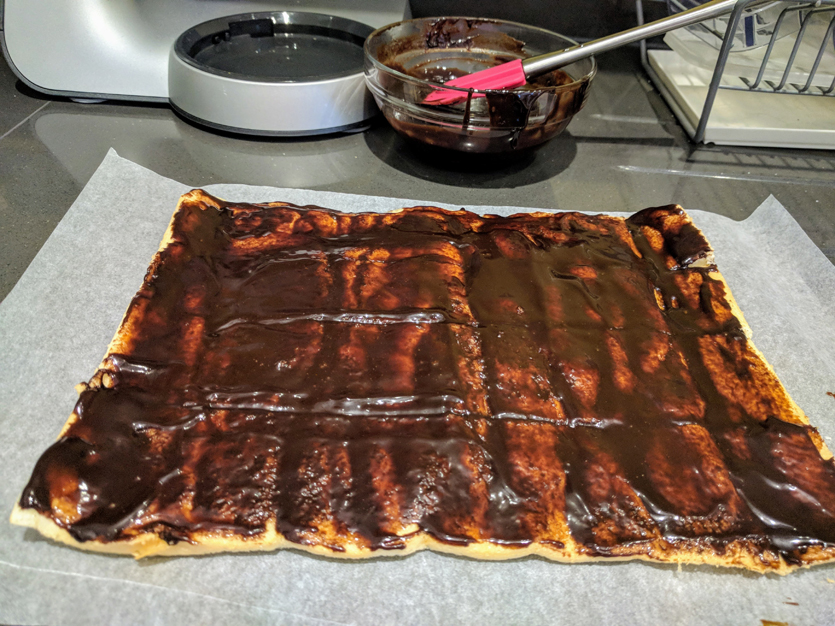
Cover the strips in the dark chocolate spread.
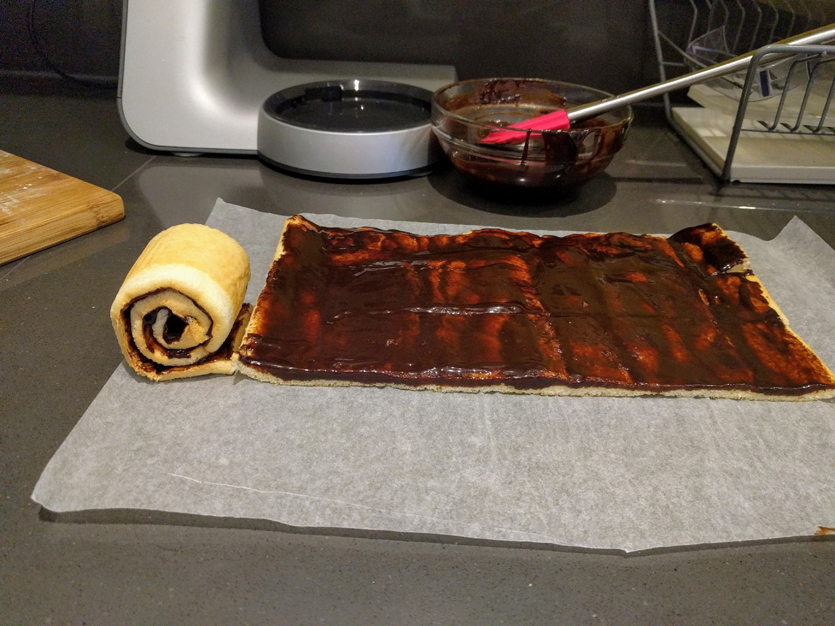
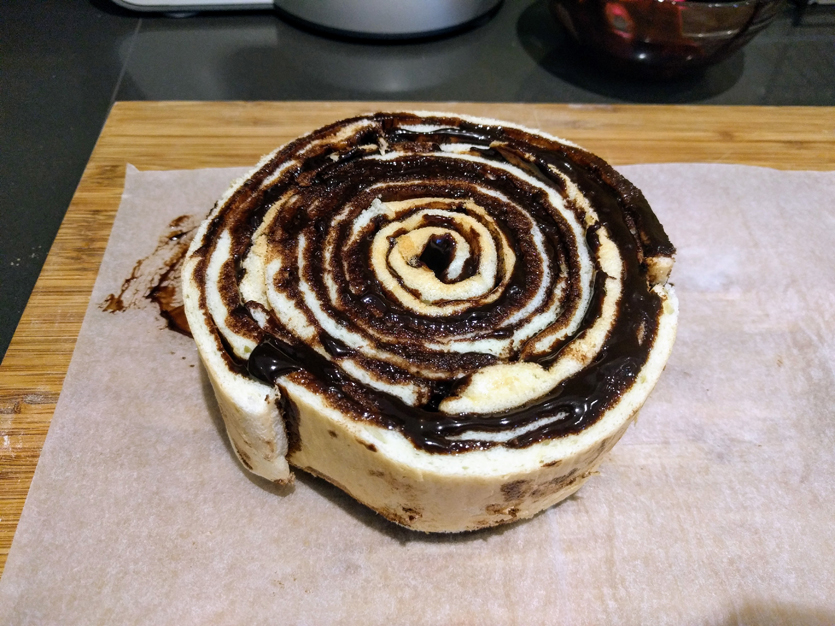
Start by rolling 1 of the strips into a tight coil – as if making a mini swiss roll. Continue adding to the coil using the rest of the strips.
There will be a point where the coil becomes too large to continue rolling it whilst adding more strips of sponge. When this happens stand the coil onto baking paper and continue to add more sponge strips to it by hand. Cool this coil in the fridge for at least 1 hour.
Mock and Whipped Cream:
Sugar -60g
Water – 60ml
Vanilla Extract – 1tsp
Gelatin – 1.5tsp (bloomed in 60ml of water)
Butter (softened) – 150g
Double cream – 150ml
Instructions:
Dissolve the sugar in the water in a saucepan, do not let to boil. Add in the vanilla. Take off heat and cool to about 50 Degrees C. Stir the bloomed gelatin into the syrup making sure it dissolves. Cool to room temperature. Whisk the butter in a mixer and then pour in the syrup mixture gradually while still whisking. Whisk the double cream in a separate bowl, and fold in gently into the mock cream mixture.
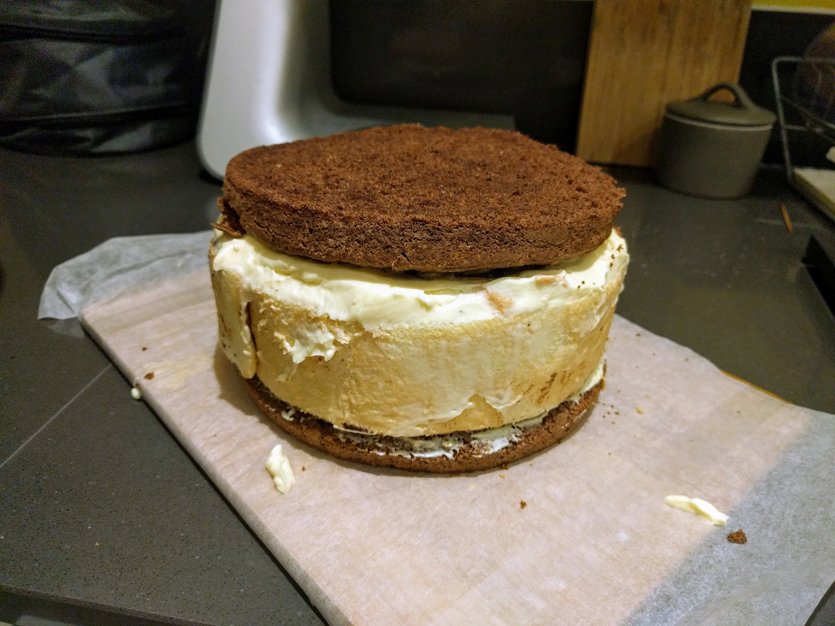
Further cake assembly instructions:
Use 1 chocolate sponge layer as a base, spread some cream over it. Place the cooled coil cake over the chocolate layer base. Cover with more cream, and sandwich the second chocolate sponge layer on the top.
To decorate, cover the rest of the cake with the cream. Sprinkle the sides with dark chocolate shavings and the chocolate sponge crumbs collected earlier. Melt some dark chocolate and draw a music stave, a treble clef, and a few notes. If you don’t want to pipe straight onto the cake look at this post on piping text onto a cake. Use the leftover cream to pipe a shell border.
Variations:
If you want a shorter cake that is wider, keep all the same quantities, but when cutting your rolling sponge into strips use a 4cm width. This way you will get 5 strips out of 1 tray of sponge rather than 4. You will then also need to use a larger round tin for baking the chocolate sponge, possible 23cm.
Add some colour!
Split the cream into 3 parts. Combine 2 of the 3 parts together and set aside, this will be your main colour of cream, if you choose to colour this, pick a very light pastel shade, or just leave it white. Colour the remaining 3rd into a bright and vibrant colour. Coat the cake in a “crumb coat” using a small amount of your light cream. Put into the fridge to set. Create an ombre effect up the sides of the cake by spooning on the darker cream onto the bottom half of the cake, and then the lighter cream on the top half of the cake. Top of the cake with the remaining light cream. Smooth the cream on the top of the cake. Then begin to smooth the sides using a horizontal motion with a scraper or spatula, a turntable helps with this greatly. Draw a music stave, a treble clef, and a few notes with the darker colour cream. If you don’t want to pipe straight onto the cake look at this post on piping text onto a cake. Use the leftover dark mock cream to pipe a shell border.